dbt Core in PopSQL for beginners
If you're new to dbt Core™ you can get up and running quickly by using PopSQL's dbt integration. In this article we'll introduce you to basic dbt concepts and show you how to start your dbt project in PopSQL.
This guide is meant for people who are new to dbt and want to try it out inside of PopSQL. If you're already familiar with dbt and want to try out PopSQL's dbt integration using your existing dbt project, check out the dbt integration documentation.
Before we dive into setup steps for using dbt in PopSQL, let's review some basic dbt concepts. If you're already familiar with models and macros, you can skip to the Creating a new dbt project section below, and if you've already got a dbt project, skip to Setting up your dbt models in PopSQL.
Introduction to dbt Models
Data transformation tools have come a long way in recent years, and one of the standout tools in the modern data stack is dbt. It offers a fresh approach to transforming and modeling data in the data warehouse itself, using the SQL skills analysts already possess. Below are some key concepts of dbt models, but if you want to learn more, check out PopSQL's blog post on dbt models.
Key Concepts:
-
SQL-Based: At its core, dbt allows analysts and data engineers to write, document, and execute SQL-based transformations. If you know SQL, you can get started with dbt!
-
Models: In the context of dbt, a "model" is a single SQL query. These models define the transformation logic, turning raw source data into more usable forms like dimensional tables, fact tables, or aggregations. When you run a dbt model, it will compile your SQL code and execute it in your data warehouse.
-
Version Control: One of the benefits of dbt is its integration with version control systems like Git. This means all changes to data models can be tracked over time, facilitating collaboration and ensuring that there's an audit trail of changes.
-
Testing: dbt allows users to define tests on their models to ensure data integrity and accuracy. These can be simple tests like checking for null values or more complex ones ensuring unique keys and data freshness.
-
Documentation: With dbt, every piece of your data transformation process can be documented. When combined with dbt's metadata features, this means analysts can understand not only the structure of the data, but also the meaning and business context behind it.
-
DAG (Directed Acyclic Graph): One of the powerful concepts behind dbt is the ability to define dependencies between models. This means that when you run your transformations, dbt understands which models need to be run first and in which order, allowing for efficient and correct processing of data transformations.
In summary, dbt models play a critical role in the modern analytics workflow by offering a SQL-centric way to transform and model data directly in the data warehouse. By blending version control, testing, and documentation into the mix, dbt elevates the discipline of data transformation and modeling, making it more accessible, transparent, and reliable.
Introduction to dbt Macros
While dbt models offer a structured way to transform data using SQL, sometimes you'll find repetitive SQL patterns or logic that you'd like to reuse across different models or projects. That's where dbt macros come into play. If you want to learn more about dbt macros and using Jinja, check out PopSQL's blog post on the topic.
Key Concepts:
-
Reusable SQL: A dbt macro is essentially a reusable piece of SQL code. Think of it like a function in traditional programming; once defined, you can invoke a macro multiple times in various places, potentially with different arguments.
-
Jinja Templating: dbt macros utilize the Jinja2 templating engine. This allows for dynamic SQL generation based on conditions, loops, and other programming constructs. It makes the SQL in dbt macros flexible and adaptable to various scenarios.
-
Custom Functions: Beyond just reusing SQL snippets, macros can be used to define custom functions that might not be natively supported by your data warehouse. This can be especially useful for consistent calculations or string manipulations.
-
Built-in Macros: dbt ships with a set of built-in macros that cater to common SQL patterns and data transformation needs. This ensures that you don't have to reinvent the wheel for standard tasks.
-
Cross-platform Compatibility: One of the challenges of working with different data warehouses is the slight SQL syntax differences between them. dbt macros can help abstract these differences. By using macros, you can write SQL that's agnostic to the underlying warehouse, making your dbt projects more portable.
In conclusion, dbt macros are powerful tools in the dbt arsenal that promote code reusability, consistency, and cross-platform compatibility. By harnessing the power of Jinja2 templating and the modular nature of macros, analysts and data engineers can create more maintainable and scalable dbt projects.
Creating a new dbt project
There are a bunch of sample dbt projects available out there to review before you get started (here's a huge list to get you started).
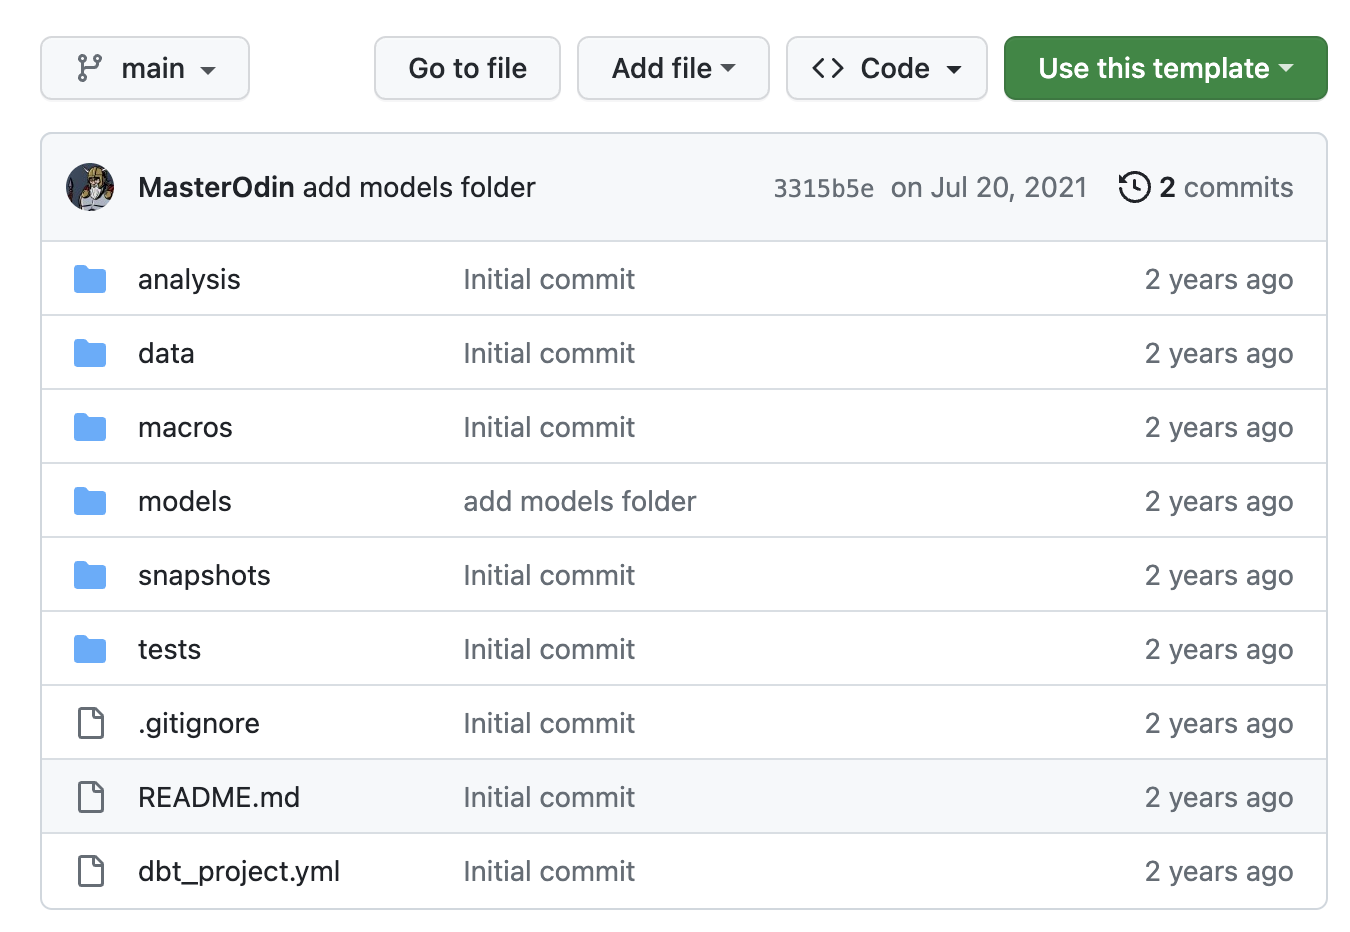
Since you're using dbt Core in PopSQL, you don't need to worry about installing python, dbt, git, etc. on your local computer and you won't need to manage your own local profiles.yml file. The easiest way to get started on PopSQL is to use the PopSQL dbt template. All you need to do is click the Use this template button, then Create a new repository.
Once your new project exists, you can connect it to PoSQL (setup guide here) and start adding models and macros. Next, we'll walk through an example project and show you how to get started.
Getting started with dbt in PopSQL
For the purpose of this guide, we've set up a sample dbt project that uses open-source ecommerce data in BigQuery. The rest of this guide will walk you through setting up and using an enriched orders dbt model with that data.
1) Plan out your dbt mart
The dbt models that are used to power analysis are called "marts". The term data mart is a common term that refers to a subset of your data warehouse that is designed for use by end users, usually for a very specific reason.
For our example, we'll be creating an orders mart that enriches the raw orders table with information from other tables (users, products, order_line_items). That way, when we want to write a query, we have all the data we need in one table, rather than writing a complex query with multiple joins and aggregations every time.
These are the fields we need in our orders mart to build reports for the team:
| Order time fields | Order details | User details |
|---|---|---|
| Created time and month | Order ID | User ID |
| Shipped time and month | Status | Age |
| Total | ||
| Total (men's department) | Traffic source | |
| Total (women's department) |
Next, we'll work backwards to make sure we have all the right raw data to power these fields in the data mart.
2) Define your dbt sources
The first step is to tell dbt which tables it should be looking at. We'll also add some basic tests to these sources to make sure there are no obvious issues with the source data before we feed it into our models. You can read more in PopSQL's tutorial page about dbt sources.
Sources are defined in source config .yml files (see official dbt docs for more info). These files need to be in your /models/ folder, or a subdirectory like /models/staging/ or /models/ecommerce/staging/. We're putting our sources file for the ecommerce data into /models/staging/ since right now ecommerce is the only data source we have.
The file name should follow a consistent format, so as you add more sources to your project, it's easy to keep them straight. The most common naming structure is a single underscore, followed by the source group, then __sources.yml. So for our ecommerce example, we'll use a file name of _ecommerce__sources.yml.
The most basic version of our sources config file needs to tell dbt which schema and tables to reference. The source name is the database schema, and the source tables are listed one layer below, like this:
version: 2

sources:
  - name: ecommerce

    tables:
      - name: orders
      - name: order_items
      - name: products
      - name: users
It's recommended to add some basic data quality tests to source config files as well, specifically checking for unique and non-null values in important columns for each table. After adding those checks for our sources, the file looks like this:
version: 2

sources:
  - name: ecommerce

    tables:

      - name: orders

        columns:
          - name: order_id
            tests:
              - unique
              - not_null
          - name: created_at
            tests:
              - not_null

      - name: order_items

        columns:
          - name: id
            tests:
              - unique
              - not_null
          - name: created_at
            tests:
              - not_null

      - name: products

        columns:
          - name: id
            tests:
              - unique
              - not_null
          - name: name
            tests:
              - not_null
          - name: sku
            tests:
              - not_null

      - name: users

        columns:
          - name: id
            tests:
              - unique
              - not_null
          - name: created_at
            tests:
              - not_null
The version: 2 part of the file ensures dbt reads your files correctly, more info here.
When you use dbt commands like dbt build or dbt test, you'll see errors if any of your data checks from this file fail. For example, this is the output after running dbt test against our ecommerce products source:
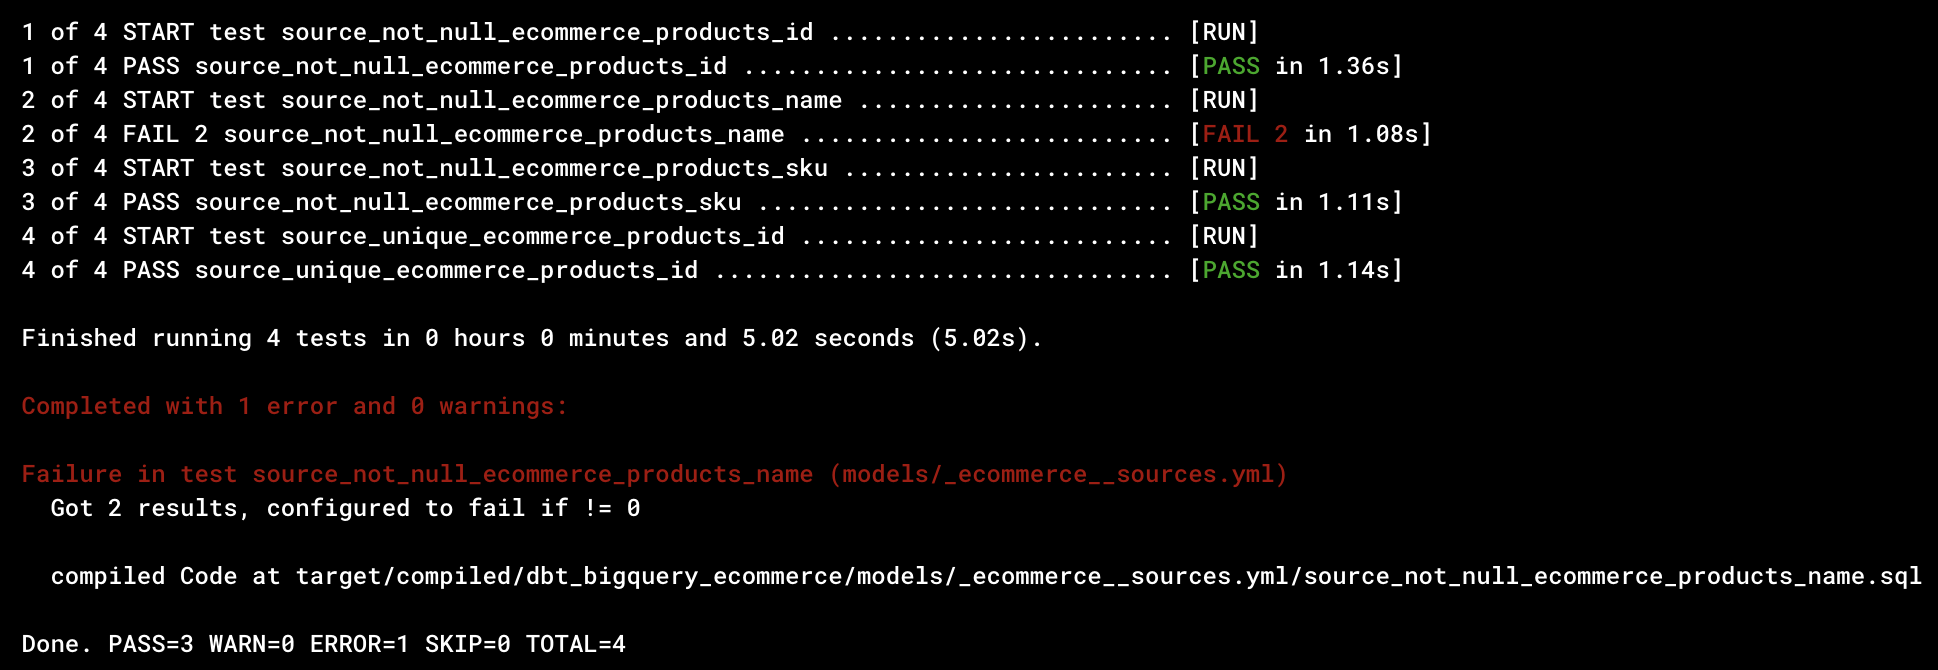
This tells us that three tests passed, and one failed. The failure was due to some product name fields having NULL values.
3) Add staging models
Now that dbt knows which tables contain important data, we will create our first level of models, called staging models. There will be one (and only one) staging model for each source you defined.
In dbt, staging models are the foundational layer of your transformation process. Think of them as your data's "cleaning" step. They take raw data from your sources and turn it into a more usable format, but without adding business logic just yet. Staging models typically:
- Rename or alias fields to be more understandable.
- Remove fields that aren't needed in data marts.
- Convert data types to more appropriate formats.
- Filter out any irrelevant records (like deleted or corrupted rows).
By creating staging models, you ensure that all subsequent models (like the ones where you apply business logic) have a consistent, clean, and clear starting point. It's like preparing and organizing your ingredients before you start cooking.
In our example, we need four staging models: orders, order_items, products, users. We'll walk through creating the orders staging model below, but you can see all the staging models in our sample dbt project on Github.
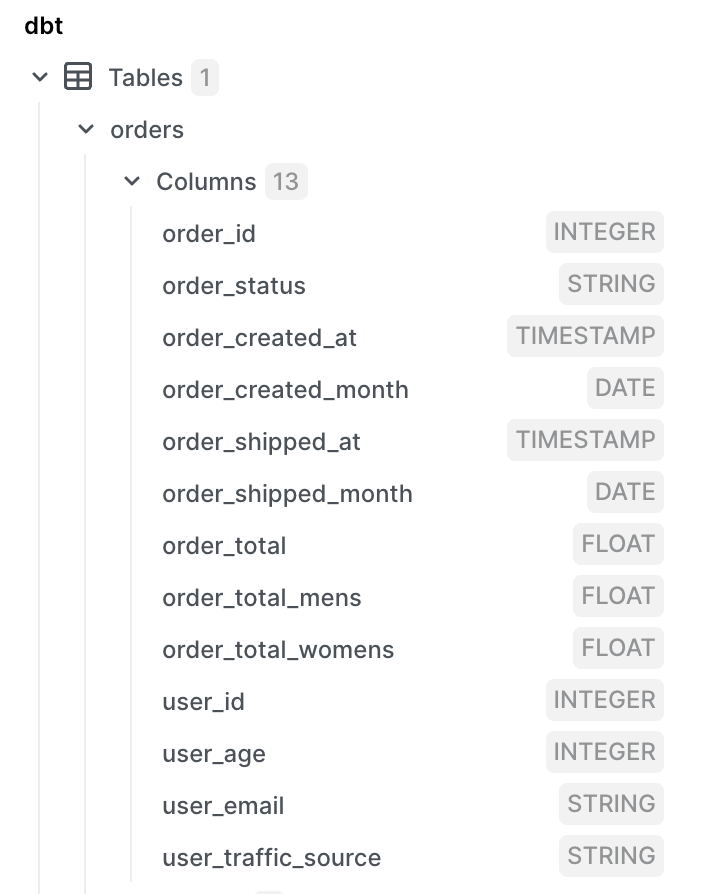
The orders table in our sample data has these columns:
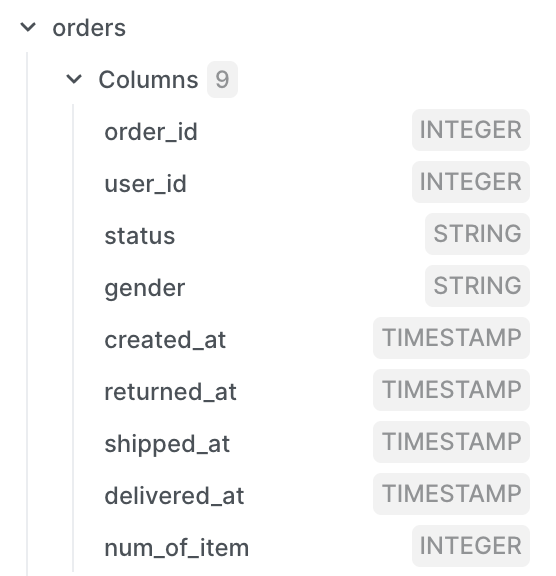
Based on our initial requirements, we need all the columns except for gender, returned_at, and delievered_at. We also need to add created_month, shipped_month fields. We know that our database stores timestamps in UTC timezone, but the team has asked us to make sure all reports are based on US Central timezone.
The first version of our query to build the orders staging model would look like this. We've only selected the fields we need, we converted to US Central timezone, and added month versions of each timestamp.
select

	order_id,
	user_id,

	status as order_status,
	num_of_item as num_order_items,

  timestamp(datetime(created_at), "America/Chicago") as order_created_at,
  timestamp(datetime(shipped_at), "America/Chicago") as order_shipped_at,

  date_trunc(date(created_at, "America/Chicago"), month) as order_created_month,
  date_trunc(date(shipped_at, "America/Chicago"), month) as order_shipped_month,

from {{ source('ecommerce', 'orders') }}
The model selects from a reference to our orders source, never reference actual tables in dbt models, always use references to sources in staging models, like {{ source('ecommerce', 'orders') }}.
We need to repeat the process of adding staging models for other sources: order_items, users, and products. You can see them all in the sample project here. Once complete, we're almost ready to create our orders data mart. We have these fields available across four sources:
| Order time fields | Order details | User details |
|---|---|---|
| ✅ Created time and month | ✅ Order ID | ✅ User ID |
| ✅ Shipped time and month | ✅ Status | ✅ Age |
| ❌ Total | ||
| ❌ Total Men's | ✅ Traffic source | |
| ❌ Total Women's |
Since we don't have an order_total field in the orders table, and we need a breakdown between the Men's and Women's departments, getting those totals will require us to sum up the sale_price from order items in each order. A calculation like that should be done in an intermediate dbt model. We'll handle that in step 5, but first we'll clean up these staging models a bit using dbt macros.
4) Create macros to simplify repeated transformations
There's one more thing we need to do before moving on. We repeat ourselves when converting UTC timestamps to US Central time, and again when converting them to month fields. Most likely we'll need to convert other timestamps in a similar manner, so let's create a couple of dbt macros to handle those conversions.
In this section we'll walk through how to create macros in PopSQL to replace the repetitive transformations. When you get started, macros will be used mostly in your staging files to clean up raw data, like this staging model for the orders source:
select

	order_id,
	user_id,

	status as order_status,
	num_of_item as num_order_items,

  timestamp(datetime(created_at), "America/Chicago") as order_created_at,
  timestamp(datetime(shipped_at), "America/Chicago") as order_shipped_at,

  date_trunc(date(created_at, "America/Chicago"), month) as order_created_month,
  date_trunc(date(shipped_at, "America/Chicago"), month) as order_shipped_month,

from {{ source('ecommerce', 'orders') }}
We want to create two macros, one that converts UTC timestamps saved as "no timezone" (ntz) to US Central timezone, and another one that converts those same timestamps to US Central time and also truncates to month. To keep the macro flexible, we'll label them as to_reporting_tz that way if the business team changes our default reporting timezone to a different timezone, we only need to update one line of code.
Both macros will be .sql files in the /macros/ directory of the dbt project. For simple macros like these, you'll use the same format with a single column_name input, like this:
{% macro ntz_to_reporting_tz(column_name) %}

    timestamp(datetime({{column_name}}), "America/Chicago")

{% endmacro %}
In the macro that converts the timezone and truncates to month, we can reference the first macro, like this:
{% macro ntz_to_reporting_tz_month(column_name) %}

    date_trunc(
        date({{ ntz_to_reporting_tz(column_name) }}),
        month
    )

{% endmacro %}
Now we have two useful macros for what we need now, and if the reporting timezone changes we can easily update it in one place (the ntz_to_reporting_tz macro) and all timestamps and truncated months will be updated to the new timezone.
There are much more complex macros you can create, like looping through values returned from the database, but we'll keep it simple for now with straightforward manipulation of a single column.
Once these macros are created and saved in the /macros/ directory, we can update our staging model file to use them:
select

	--id fields
	order_id,
	user_id,

	--order details
	status as order_status,
	num_of_item as num_order_items,

	--timestamps in reporting timezone
	{{ ntz_to_reporting_tz('created_at') }}  as order_created_at,
	{{ ntz_to_reporting_tz('shipped_at') }}  as order_shipped_at,
	{{ ntz_to_reporting_tz('delivered_at') }}  as order_delivered_at,

	--truncated months in reporting timezone
	{{ ntz_to_reporting_tz_month('created_at') }}  as order_created_month,
	{{ ntz_to_reporting_tz_month('shipped_at') }}  as order_shipped_month,
	{{ ntz_to_reporting_tz_month('delivered_at') }}  as order_delivered_month,

from {{ source('ecommerce','orders') }}
You can see that in order to use the macros, the format is similar to the model and source references, but you'll use the macro name as the keyword, and the column name as the input for the macro. The model above will render like this when you preview, run, or build your model:
select

	--id fields
	order_id,
	user_id,

	--order details
	status as order_status,
  num_of_item as num_order_items,

	--timestamps in reporting timezone
  timestamp(datetime(created_at), "America/Chicago") as order_created_at,
  timestamp(datetime(shipped_at), "America/Chicago") as order_shipped_at,

	--truncated months in reporting timezone
  date_trunc(date(timestamp(datetime(created_at), "America/Chicago")), month) as order_created_month,
  date_trunc(date(timestamp(datetime(shipped_at), "America/Chicago")), month) as order_shipped_month

from `popsql-gcp`.`ecommerce`.`orders`
5) Create intermediate dbt models for aggregations
Next, we'll create an intermediate model, that will join staging models together and allow us to create aggregations and breakdowns. In order to get accurate values for order_total, order_total_mens and order_total_womens, we need these fields: order_id, order_item_sale_price, and product_deparment (Men or Women). In this model, we'll use model references rather than source references, since we're referencing our staging models, e.g. {{ ref('stg_ecommerce__orders') }}. Source references should only be used in staging models.
We're also using a macro {{ money() }} that we created to round numbers to two decimal points for money fields. Here's what the intermediate model looks like:
with order_totals as (

    select
        o.order_id,
        sum(oi.order_item_sale_price) as order_total_raw,

        sum(case when p.product_department = 'Men'
            then oi.order_item_sale_price else 0 end) as order_total_mens_raw,

        sum(case when p.product_department = 'Women'
            then oi.order_item_sale_price else 0 end) as order_total_womens_raw

    from {{ ref('stg_ecommerce__orders') }} as o

        inner join {{ ref('stg_ecommerce__order_items') }} as oi
            on oi.order_id = o.order_id

        inner join {{ ref('stg_ecommerce__products') }} as p
            on p.product_id = oi.product_id

    group by o.order_id

)

select
    order_id,
    {{ money('order_total_raw') }} as order_total,
    {{ money('order_total_mens_raw') }} as order_total_mens,
    {{ money('order_total_womens_raw') }} as order_total_womens

from order_totals
6) Create your data mart model
Now that all the fields we need are defined in staging or intermediate models, we can bring everything together to create the orders data mart. Naming convention for marts is simple, make it as obvious and easy to understand as possible. In our case we're just going to call the data mart orders since it's just an enriched version of the raw orders table that's easier to use for reporting and analysis.
There should be no renaming or manipulation of data in your data mart dbt models. You'll also never reference data sources in these models. All you need to do is join together staging and intermediate models. The orders mart for this demo would look like this:
{{
    config(
        materialized = 'table'
    )
}}

select

    --order details
    o.order_id,
    o.order_status,

    --order timestamps and months
    o.order_created_at,
    o.order_created_month,
    o.order_shipped_at,
    o.order_shipped_month,

    --order item details
    oi.order_total,
    oi.order_total_mens,
    oi.order_total_womens,

    --user details
    u.user_id,
    u.user_age,
    u.user_email,
    u.user_traffic_source

from {{ ref('stg_ecommerce__orders') }} as o

    inner join {{ ref('stg_ecommerce__users') }} as u
        on u.user_id = o.user_id

    inner join {{ ref('int_order_items_by_order') }} as oi
        on oi.order_id = o.order_id
It captures exactly the fields we need without any extra fields or complexity. If we run into any problems with a field, we can easily track down the problem by looking at the staging or intermediate model it came from.
| Order time fields | Order details | User details |
|---|---|---|
| ✅ Created Time and Month | ✅ Order ID | ✅ User ID |
| ✅ Shipped Time and Month | ✅ Status | ✅ Age |
| ✅ Total | ||
| ✅ Men's Total | ✅ Traffic Source | |
| ✅ Women's Total |
You can see that this model works just like others. It only uses model references, not any source references since those are only used in staging models. The only other difference here is the config section at the very top: materialized = 'table' this tells dbt to save this model as a table rather than a view.
Looking back at our dbt_project.yml file in the main directory of the project, this block of code tells dbt to save all models in the ecommerce space as views:
name: 'dbt_bigquery_ecommerce'
version: '1.5.0'
config-version: 2

profile: 'default'

model-paths: ["models"]
test-paths: ["tests"]
macro-paths: ["macros"]
snapshot-paths: ["snapshots"]

target-path: "target"          # directory which will store compiled SQL files
clean-targets:                 # directories to be removed by `dbt clean`
  - "target"
  - "dbt_modules"

models:
  dbt_bigquery_ecommerce:
    ecommerce:
      +materialized: view      # models will be stored as views by default
For the orders mart we want to override that default behavior and save it as a table so BigQuery doesn't need to join various tables and handle aggregations with every new query run. Putting the config at the top of the model file overrides the default behavior for just this model.
7) Build your dbt mart and upstream models
Now that everything is defined, we need to trigger some dbt commands. We'll use the dbt action button at the top-right corner in PopSQL to trigger dbt build on the orders model and all upstream models. By "upstream" we mean any model referenced in orders and the models before those, all the way back to your source tables. Once you hit that button, dbt will go through your data checks, create views for staging and intermediate tables, then create a table for the orders model. If all is well you'll see a message of Completed successfully.
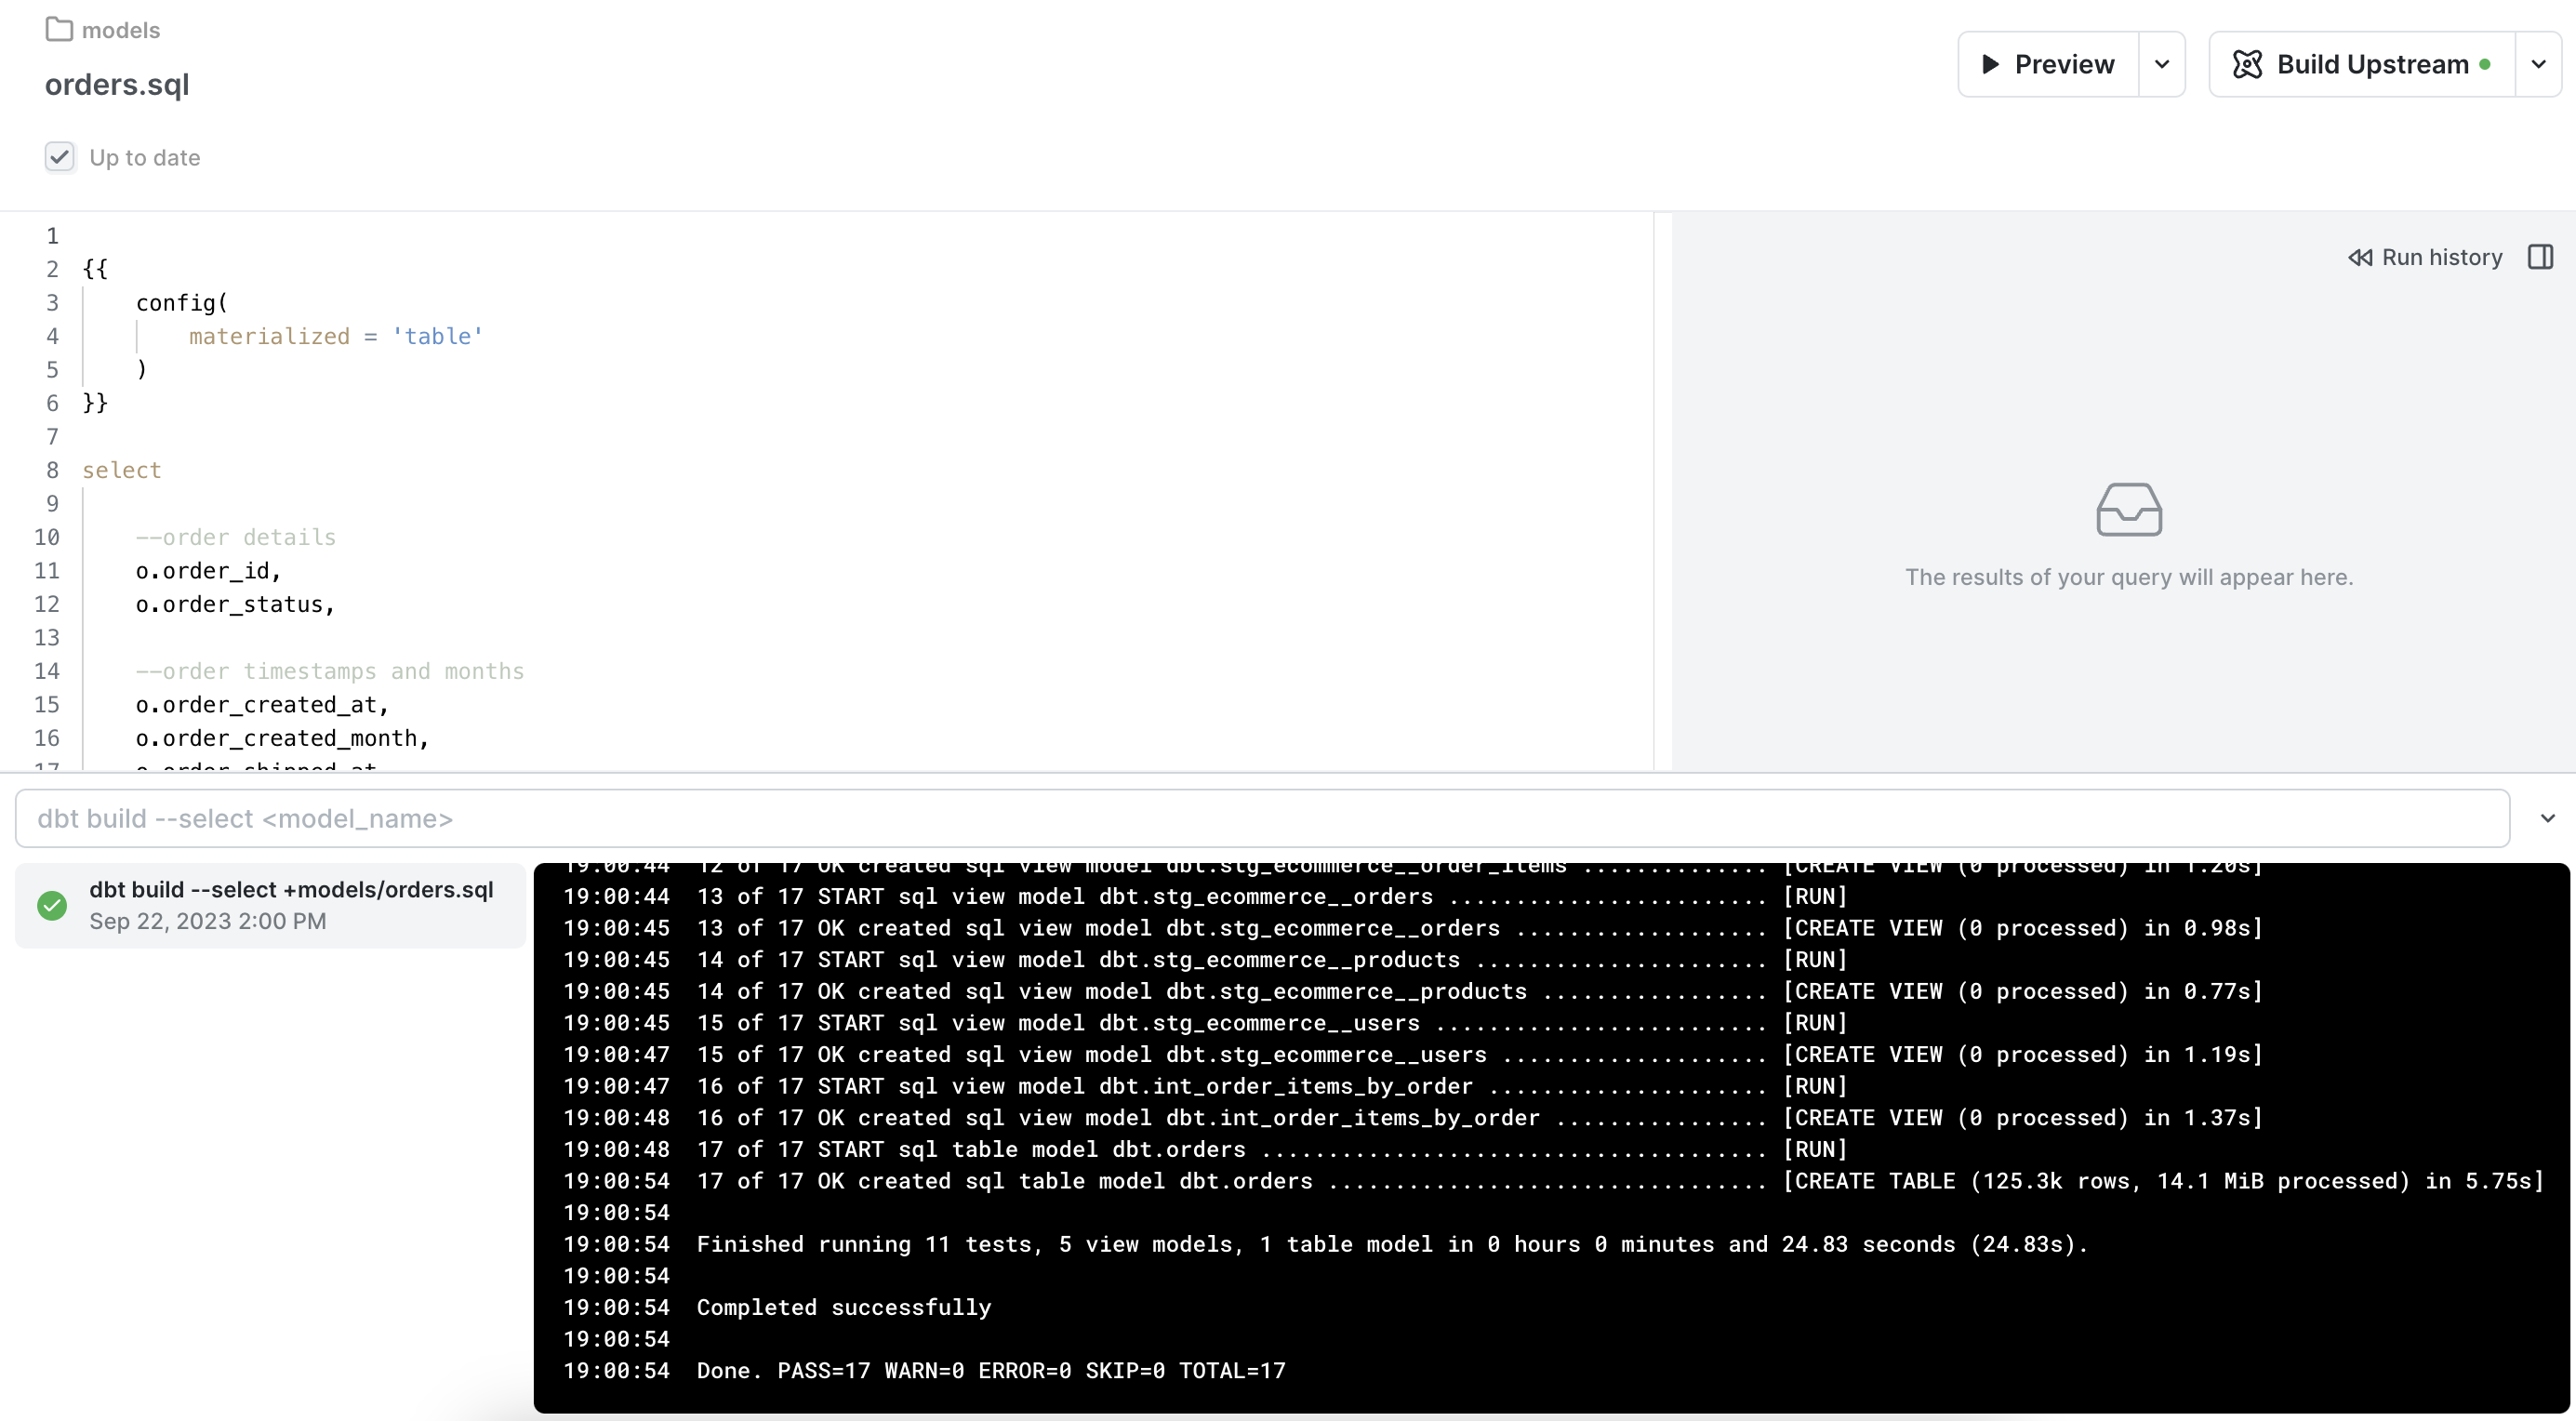
We'll now see an orders table in our dbt target schema. For this demo we're using a target schema of dbt so the table shows up there. You can check your in your organization dbt preferences in PopSQL.
8) (Optional) Schedule refreshes of your models
Anytime you make changes to your staging or intermediate models, you need to run dbt build to refresh the views that define those models in your database.
If you're materializing models as tables (like the
ordersmodel above), new data in source models will not be added to your data mart until you rundbt buildthose models.
The easiest way to handle this is to somehow automatically run dbt build shortly after source data gets refreshed. That can be done using a tool like Airflow or Dagster, or you can ask a developer to help schedule it for you. It's technically possible to manually build your models in PopSQL, but that's not recommended as a permanent solution.
If you're not noticing any performance issues with models when you leave them all as views, you might not need to materialize any of them as tables. Any models that strictly use views will still show up-to-date data from source tables, and you'd only need to run
dbt buildwhen you make any changes to the queries that define your models. In that case using only PopSQL works just fine.
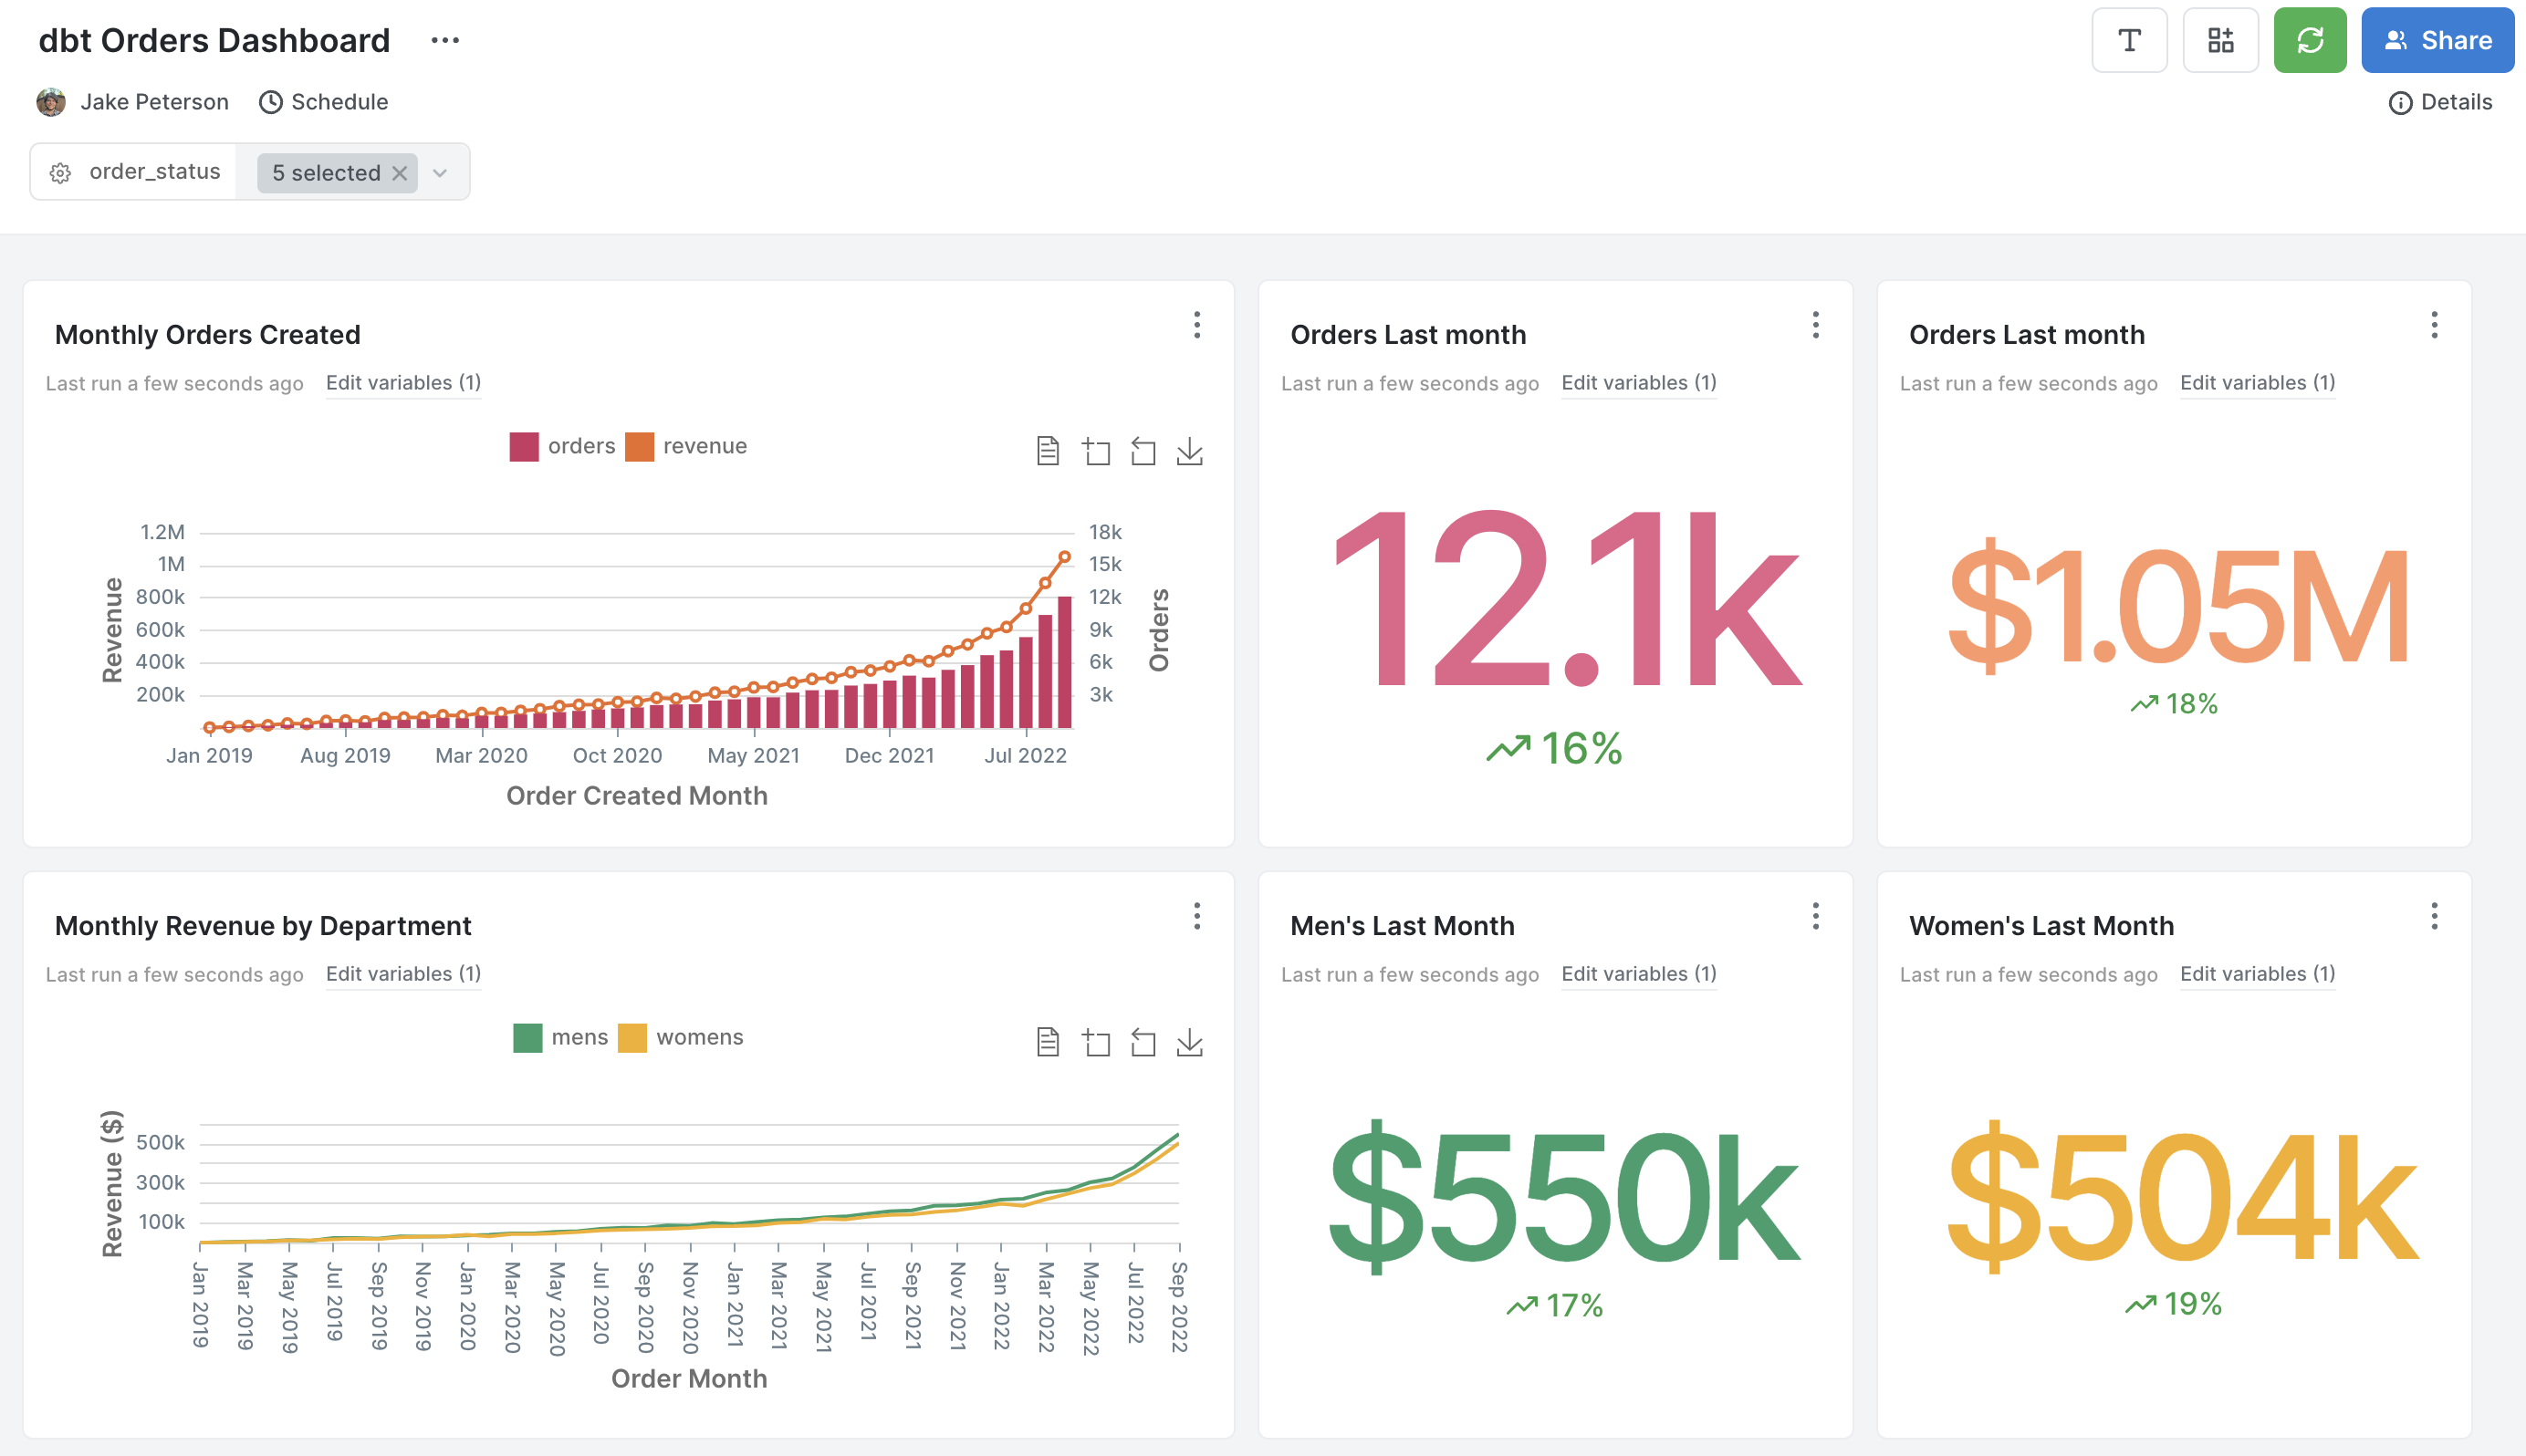
Using your dbt mart for analysis
Now that we have an orders data mart with all the data we need, that model can be used to power any reporting you need.
You can write one-off queries on top of your model, or queries with query variables to allow business users to self-serve data exports. Here's a publicly accessible presentation link for one such query with a query variable that lets logged in users filter by order status.
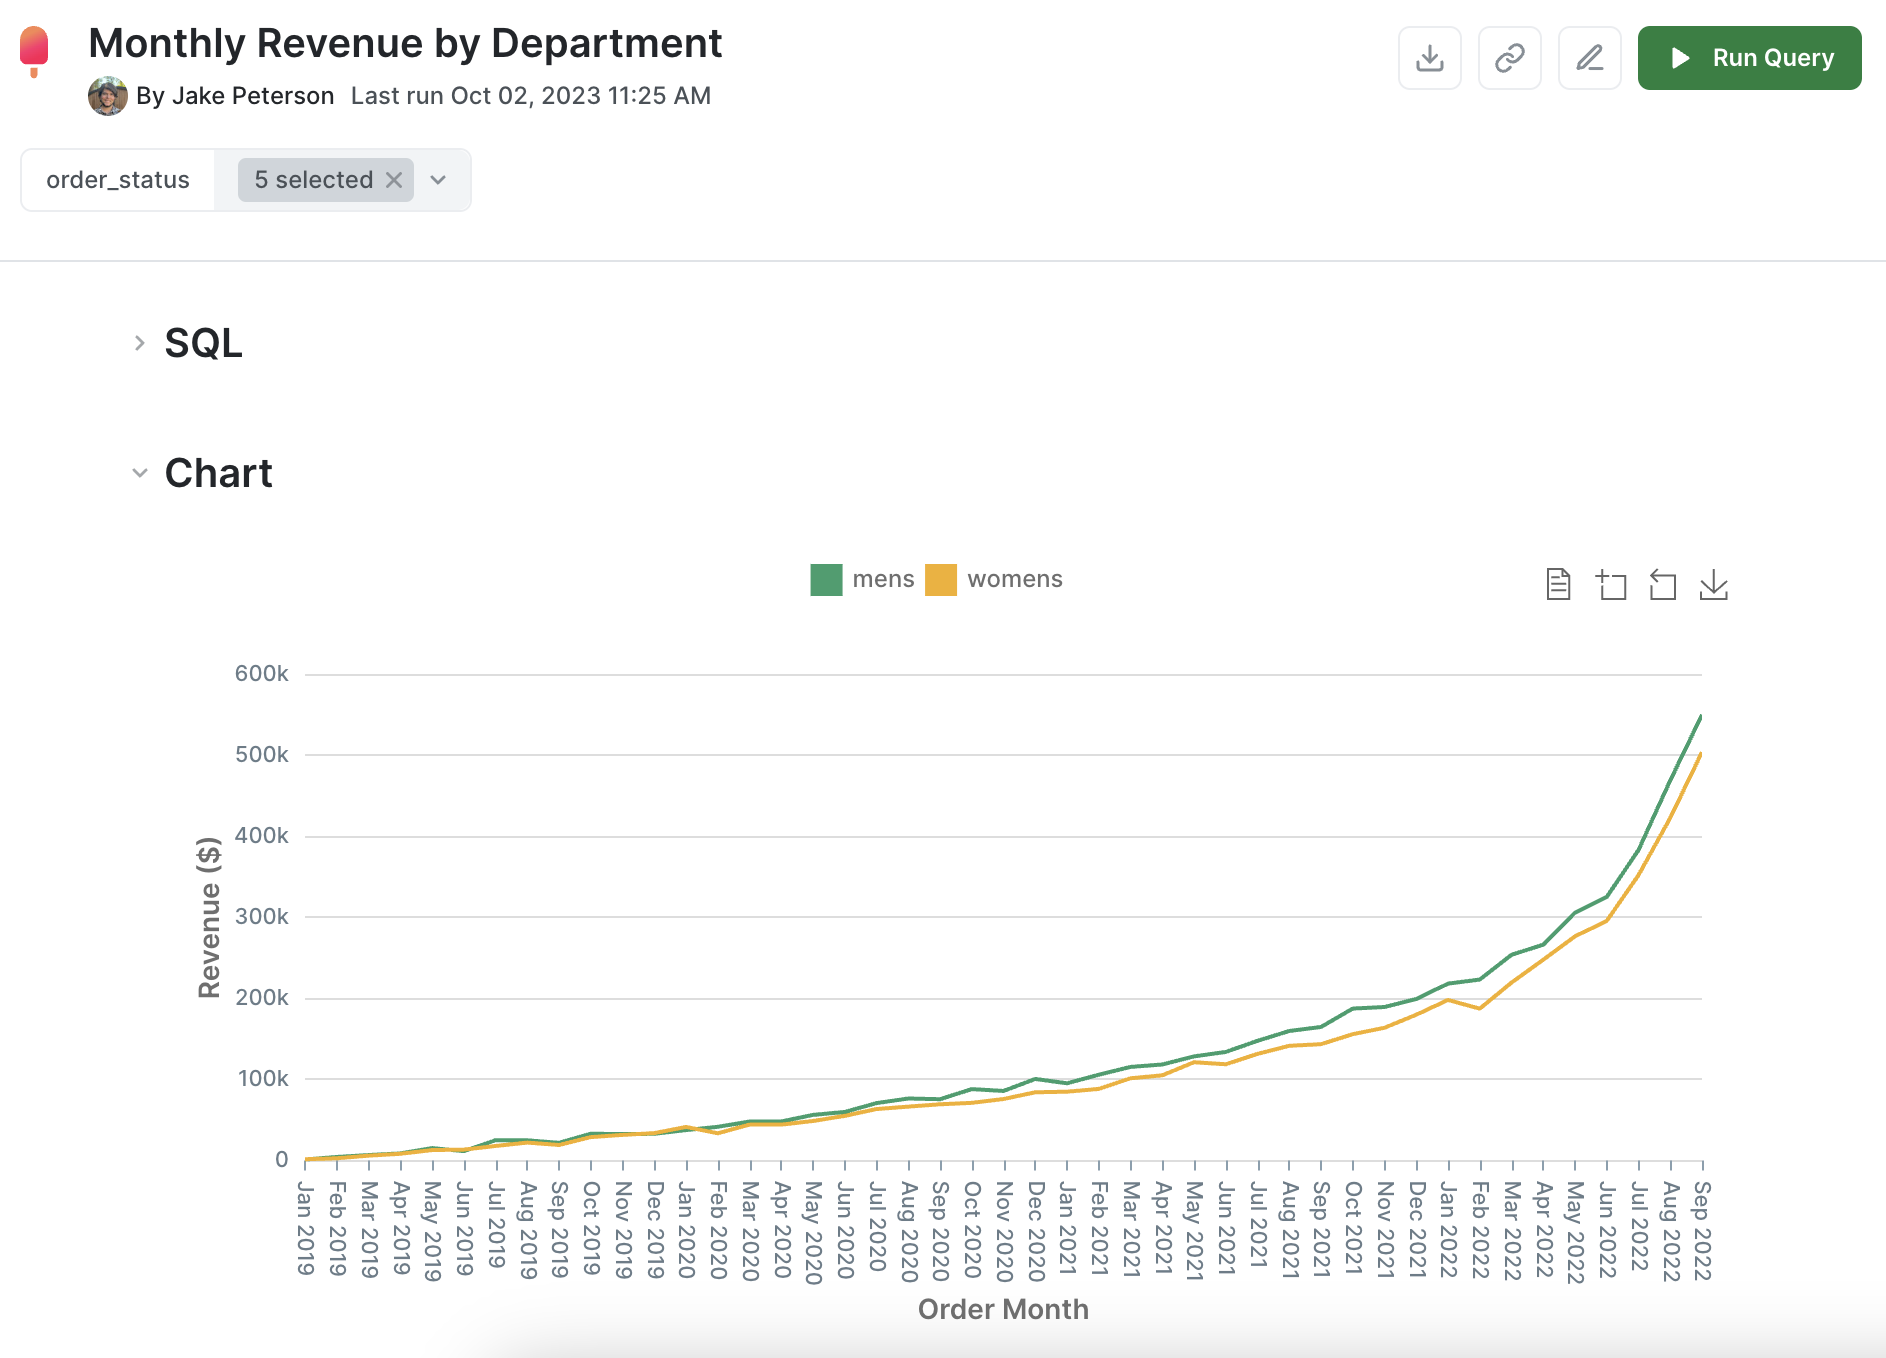
We also built an example dashboard in PopSQL on top of only the orders dbt model we created during this tutorial. You can view a live public version here. This is how it looks in PopSQL:
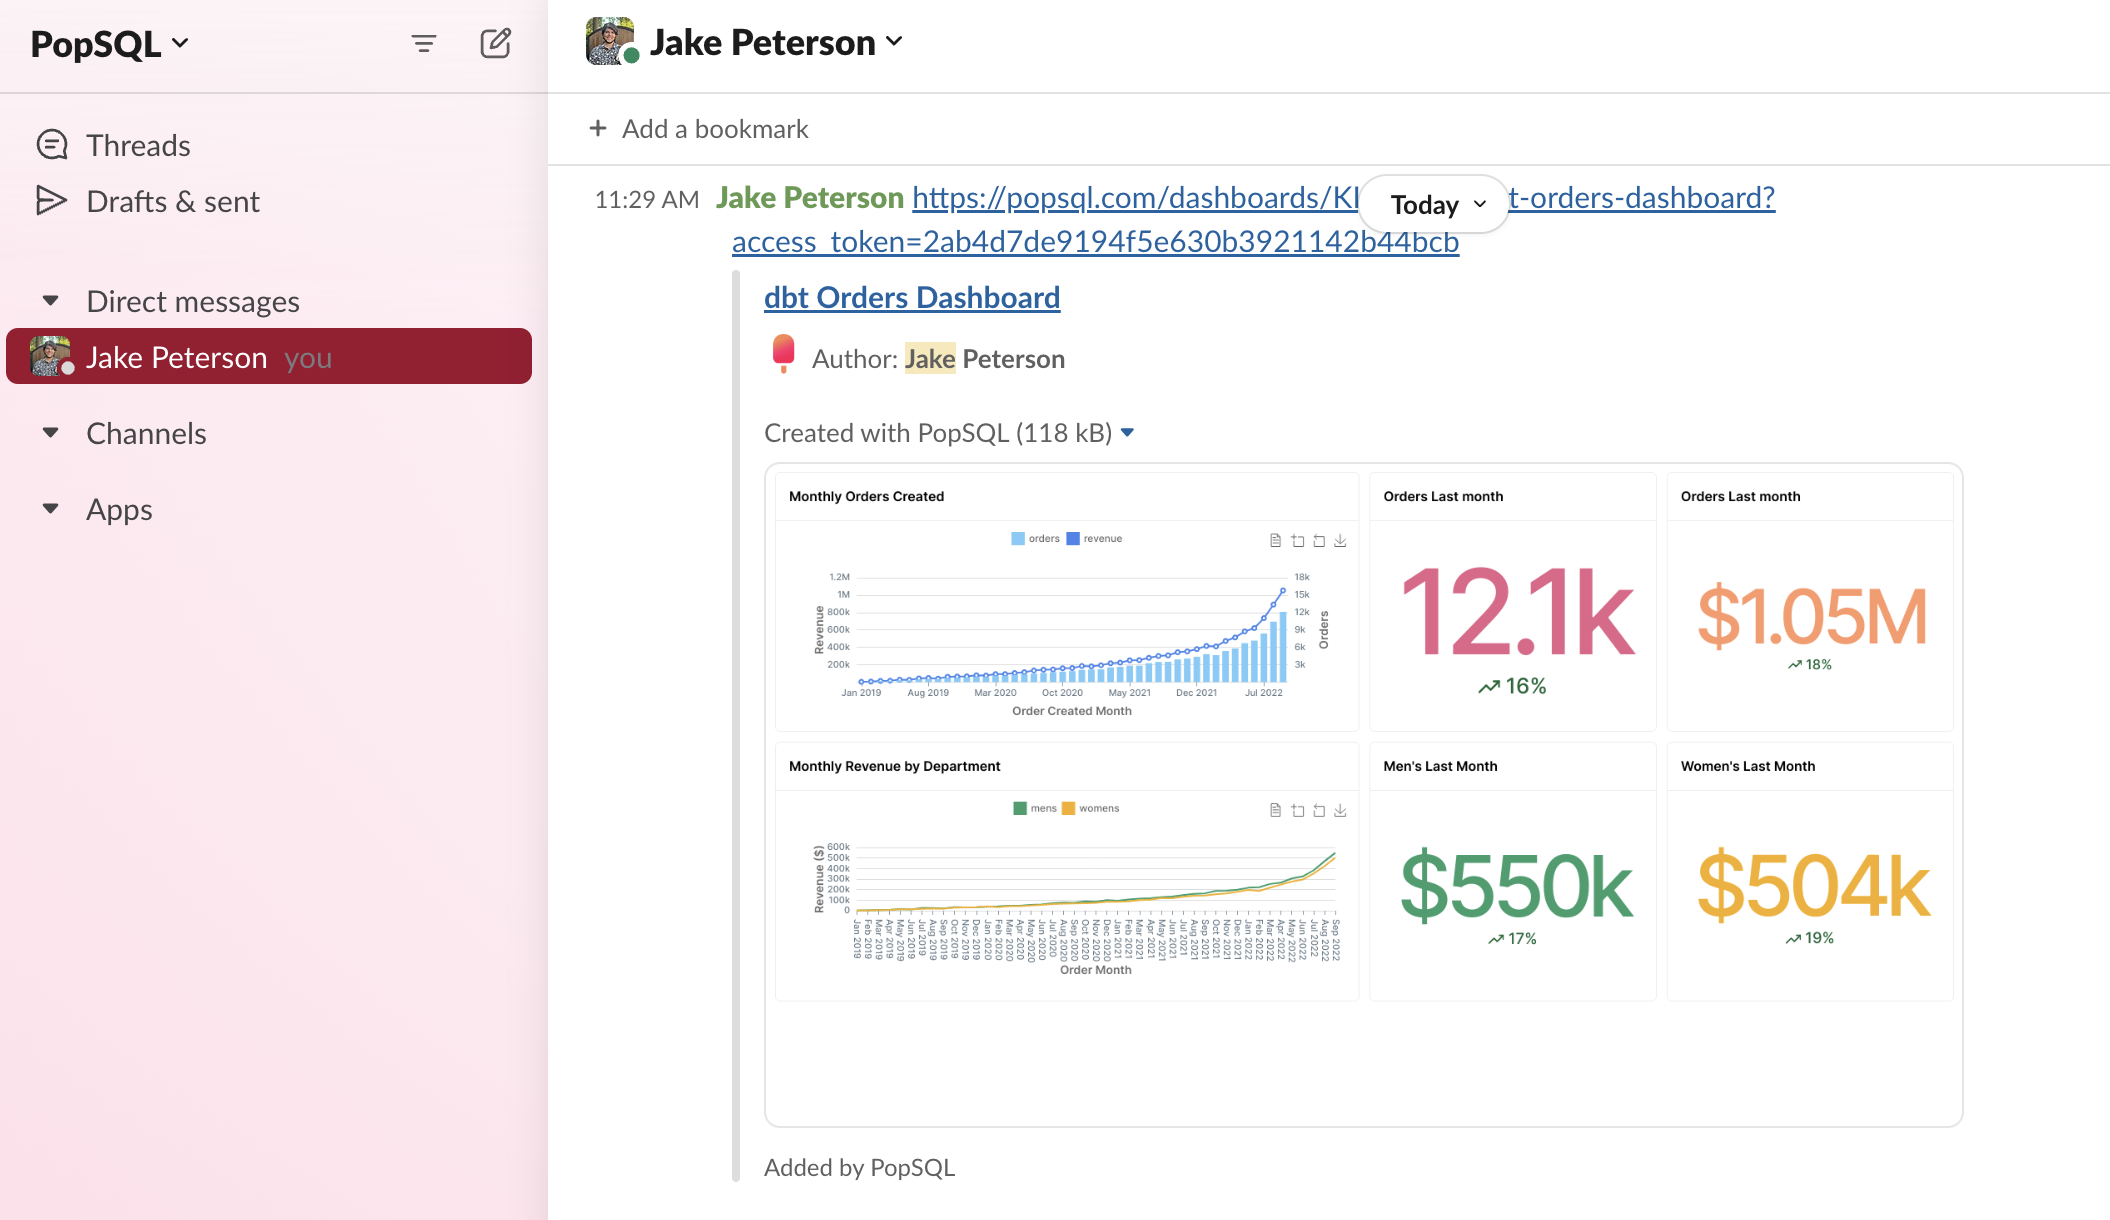
And if you schedule the same dashboard into Slack, or share the link directly with a coworker, the PopSQL Slack app will render an image and link to the dashboard, like this:
Updated 10 months ago